Blog
How To Iron A Shirt Perfectly: A Simple Step-By-Step Guide For Beginners
Introduction: Why Learning How To Iron A Shirt Matters
Learning How To Iron A Shirt is one of those simple life skills that instantly improves your overall appearance. A neatly pressed shirt gives a clean, confident, and professional look whether you are going to work, a meeting, a wedding, or even a casual outing. Wrinkles may seem small, but they can change how polished your outfit looks. The good news is that ironing a shirt is not difficult when you understand the right order, correct heat settings, and proper technique. This guide is designed for beginners who want clear, easy steps that actually work in real life.
Quick Bio Information
Shirt Ironing Is A Basic Clothing Skill
It Improves Personal Appearance Instantly
A Clean Iron Prevents Fabric Stains
Steam Helps Remove Deep Wrinkles
Cotton Shirts Need Medium To High Heat
Polyester Shirts Need Low Heat Settings
Linen Shirts Are The Most Difficult To Iron
Ironing Boards Provide A Flat Surface
Slightly Damp Shirts Iron More Easily
Collars Should Always Be Ironed First
Sleeves Require Careful Flat Positioning
Buttons Should Never Be Ironed Directly
Heat Settings Depend On Fabric Type
Regular Iron Cleaning Prevents Marks
Proper Setup Improves Ironing Efficiency
Hanging Shirts Prevents New Wrinkles
Steam Irons Work Better Than Dry Irons
Beginners Should Practice On Cotton Shirts
Proper Ironing Extends Shirt Lifespan
A Well-Ironed Shirt Boosts Confidence
What You Need Before You Start Ironing A Shirt
Before you begin ironing, it is important to gather the right tools. A clean steam iron is essential because dirt or burnt residue on the iron can leave marks on fabric. An ironing board helps you maintain a flat surface so the shirt does not wrinkle again while you work. You should also have a freshly washed shirt, slightly damp if possible, because moisture helps remove wrinkles more easily. In 2026, many people also use filtered or distilled water in steam irons to prevent mineral buildup and extend the iron’s life. A spray bottle can also be helpful for stubborn creases.
Choosing The Right Shirt For Easy Ironing
Not all shirts are equally easy to iron. Cotton shirts are the most common but they also wrinkle quickly, so they require careful pressing. Polyester blends are easier because they hold shape better and need less heat. Linen shirts look stylish but are the hardest to iron due to deep natural creases. For beginners learning How To Iron A Shirt, it is best to start with cotton blends because they respond well to steam and are forgiving if you make small mistakes.
Setting Up Your Ironing Space For Best Results
A proper setup makes ironing faster and safer. Place your ironing board in a well-lit area so you can clearly see wrinkles and folds. Adjust the height so your arm moves comfortably without strain. Make sure the iron is placed on a stable surface nearby. Many people rush this step, but a good setup prevents accidents and ensures smoother results. A clutter-free space also helps you focus on each section of the shirt without distraction.
Understanding Iron Heat Settings For Different Fabrics
Heat control is one of the most important parts of How To Iron A Shirt correctly. Most irons have low, medium, and high settings. Synthetic fabrics require low heat, while cotton can handle medium to high heat with steam. Linen needs high heat but careful handling. Using the wrong temperature can damage fabric or create shine marks that are hard to remove. Always check the shirt label before starting, as modern clothing in 2026 often includes clear ironing symbols for guidance.
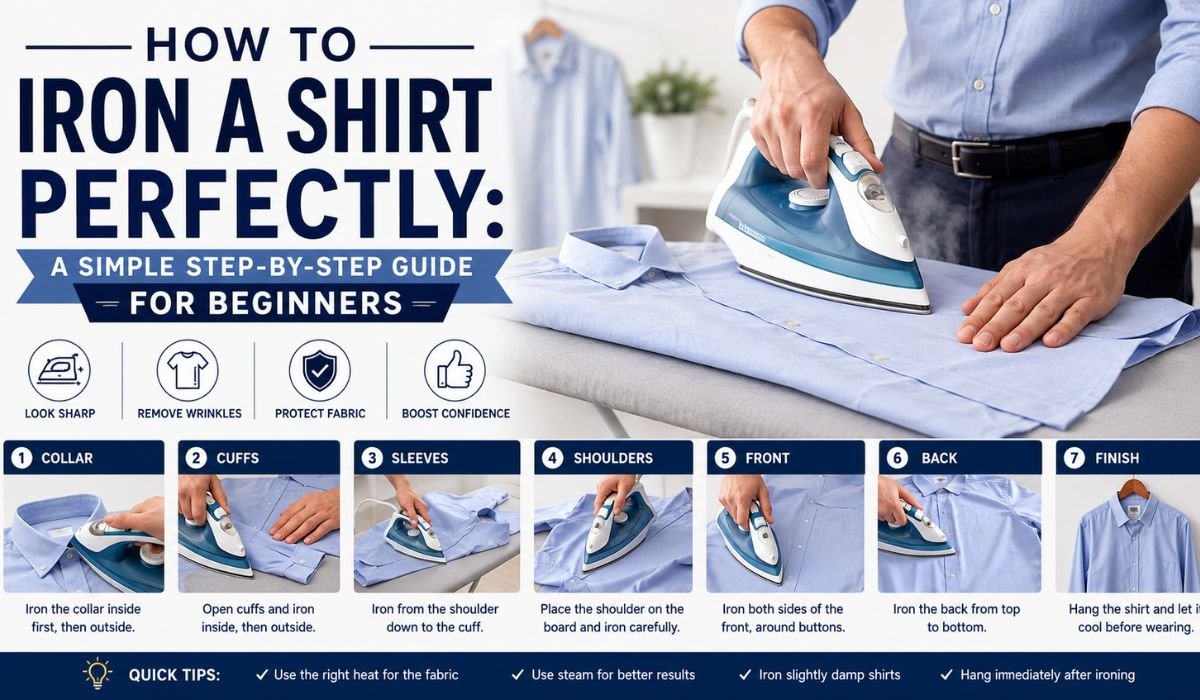
Step 1: How To Iron The Shirt Collar Properly
The collar is the most visible part of a shirt, so it should always be ironed first. Start by laying it flat and unbuttoning any collar stays if present. Iron the underside first, moving from the edges toward the center. Then flip it over and repeat the process. This method helps the collar keep its shape and prevents curling. A well-ironed collar immediately improves the overall appearance of the shirt.
Step 2: Ironing Shirt Cuffs For A Crisp Finish
Cuffs often get overlooked, but they play a big role in a clean look. Open the cuffs fully and lay them flat on the ironing board. Start by pressing the inside first, then move to the outside. Be careful around buttons and seams to avoid damage. Use gentle steam if needed to remove deep wrinkles. A properly ironed cuff gives a sharp and structured finish to your sleeves.
Step 3: How To Iron Shirt Sleeves Without Creases
Sleeves are usually the trickiest part of How To Iron A Shirt. The key is to avoid creating unwanted folds. Lay one sleeve flat and align it along the seam. Iron from the shoulder area down toward the cuff in smooth, straight strokes. Then flip it over and repeat. Many beginners accidentally press a crease into the middle, so always keep the fabric fully flat. This step takes practice but gives a very clean professional look when done correctly.
Step 4: Ironing The Shirt Shoulders (Yoke Area)
The yoke, or shoulder area, needs careful positioning. Place one shoulder section over the curved edge of the ironing board so it fits naturally. This allows you to iron curved areas smoothly without forcing the fabric. Move slowly from one side toward the center, then repeat for the other shoulder. This step ensures the shirt sits properly on your body without awkward folds or bumps.
Step 5: How To Iron The Front Of A Shirt Around Buttons
The front of the shirt is highly visible, so precision matters here. Start with one side and gently press around the buttons instead of directly over them. Many modern irons include a pointed tip designed for this purpose. Use light steam for stubborn wrinkles. Move slowly down each panel to maintain a smooth finish. This section is where attention to detail makes a big difference in the final look.
Step 6: Ironing The Back Of The Shirt For A Smooth Finish
The back of the shirt covers a large surface, so take your time. Lay it flat and start from the top, working your way downward. If your shirt has a pleat in the center, avoid flattening it completely unless the style requires it. Keep strokes long and steady to maintain even pressure. This step completes the main body of the shirt and brings everything together.
Understanding Fabric Behavior In Modern Shirts
Modern shirts in 2026 often use advanced fabric blends designed for wrinkle resistance. These materials may not need heavy ironing and sometimes only require light steaming. Smart fabric technology has improved comfort, but traditional cotton shirts still dominate formal wear. Understanding how each fabric behaves helps you choose the right heat and technique, reducing effort while improving results.
Common Mistakes When Ironing A Shirt
Many beginners make small mistakes that affect the final result. Ironing a dirty shirt is one of the biggest errors because heat can lock stains into fabric permanently. Another mistake is using too much heat, which can burn fibers or leave shiny marks. Rushing through sleeves and cuffs often leads to uneven results. Forgetting to clean the iron regularly can also transfer dirt onto clothes.
Pro Tips For A Professional Finish
Experienced users follow small habits that make a big difference. Ironing slightly damp shirts makes wrinkles easier to remove. Hanging the shirt immediately after ironing prevents new creases from forming. Using steam strategically helps smooth stubborn areas without extra pressure. Regularly cleaning the iron base also keeps your clothes spotless. These simple habits make ironing faster and more effective over time.
Final Thoughts: Mastering How To Iron A Shirt
Mastering How To Iron A Shirt is not about speed but about following the right order and understanding fabric behavior. Once you learn the correct steps, it becomes a quick and satisfying task. A well-ironed shirt improves confidence and creates a strong first impression in any situation. With practice, even beginners can achieve professional-quality results at home.
FAQs About How To Iron A Shirt
What Is The Best Way To Iron A Shirt For Beginners
The best way is to follow a proper order starting with the collar, then cuffs, sleeves, shoulders, front, and back. This ensures smooth and professional results without missing important areas.
Can I Iron A Shirt Without An Ironing Board
Yes, but it is not recommended. A flat surface like a bed or table can be used in emergencies, but an ironing board gives better heat distribution and safer handling.
Should Shirts Be Wet Or Dry Before Ironing
Slightly damp shirts work best. Moisture helps relax fabric fibers, making wrinkles easier to remove with less heat and effort.
What Temperature Should I Use For Cotton Shirts
Cotton shirts usually require medium to high heat with steam. Always check the care label before adjusting the iron setting.
Why Do Shirts Get Shiny After Ironing
Shiny marks usually happen when the iron is too hot or pressed too long in one area. Using correct temperature and steam helps prevent this.
How Often Should I Clean My Iron
It is recommended to clean your iron every few weeks or whenever residue appears. This prevents stains and keeps ironing smooth and safe.
Recommended For You: Cat Food USA: A Complete Guide To Choosing The Best Food For Your Cat

Is MissAV Safe In 2026? Everything You Need To Know Before Visiting

Best Caldereta De Cordero Near Me: Where To Find Authentic Lamb Stew In The USA

How To Iron A Shirt Perfectly: A Simple Step-By-Step Guide For Beginners

Cat Food USA: A Complete Guide To Choosing The Best Food For Your Cat

Botox Near Me USA: How To Find Safe And Natural-Looking Results

What Is A Binder In Cooking? A Simple Guide To Ingredients That Hold Food Together

Fameimpact.com Explained: A Complete Guide To Influencer Marketing Success

Melissa Womer: The Untold Story Of Jim Carrey’s First Wife

Gaia Wise: Life, Family, and Rising Acting Career of Emma Thompson’s Daughter

Thelma Riley Biography: Family, Marriage, Children, And Life Today

Who Is Arleata Williams? The Untold Story of Otis Williams’ Former Wife

Who Is Milaine Desaulniers? Meet Brie Larson’s Younger Sister And Learn About Her Life

Michelle Gumbel: What We Know About Greg Gumbel’s Private Daughter

Who Is Ukil Grandberry? Inside The Life Of Omarion’s Private Brother

Who Is Lyzel Williams? A Closer Look At His Life, Career, And Marriage

Who Is Mary Ryan Ravenel? Inside The Life Of Thomas Ravenel’s First Wife

Who Is Lorelei Frygier? Inside The Life Of Kristen Bell’s Supportive Mother

Gloria DeLouise: The Untold Story Of Burt Young’s First And Only Wife

Misha Ezratti Net Worth 2025–2026: Inside The Billion-Dollar Rise Of A Real Estate Leader

Megan Avedian: Exploring Her Family Connections, Heritage, And Private Life
Is MissAV Safe In 2026? Everything You Need To Know Before Visiting
Best Caldereta De Cordero Near Me: Where To Find Authentic Lamb Stew In The USA
How To Iron A Shirt Perfectly: A Simple Step-By-Step Guide For Beginners
Cat Food USA: A Complete Guide To Choosing The Best Food For Your Cat
Botox Near Me USA: How To Find Safe And Natural-Looking Results
What Is A Binder In Cooking? A Simple Guide To Ingredients That Hold Food Together
Fameimpact.com Explained: A Complete Guide To Influencer Marketing Success
Melissa Womer: The Untold Story Of Jim Carrey’s First Wife
Gaia Wise: Life, Family, and Rising Acting Career of Emma Thompson’s Daughter
Thelma Riley Biography: Family, Marriage, Children, And Life Today

 Fashion1 year ago
Everything You Need to Know About Fashion Nova Men: Styles, Trends, and Inclusivity

 Celebrity1 year ago
Eddy Maserati: The Man Behind the Ferrari Cap, His Life, Style, and Legacy
- Celebrity1 year ago
Sharon Summerall: Life, Career, and Relationship with Don Henley
- Celebrity1 year ago
Jennifer Landon: Everything You Need to Know About the Yellowstone Star